Overview
Qvinci uses the Qvinci Sync Client to make the connection between your desktop accounting files and the Qvinci web platform. The Qvinci Sync Client works on QuickBooks Desktop files.
Intuit has announced that only QuickBooks Desktop 2022 (Pro Plus, Premier Plus, Pro and Enterprise) R3 or later is certified as fully compatible with Windows 11 64-bit.
Please do not upgrade to other editions of Windows 11 until Intuit has certified that your QuickBooks release is compatible with Windows 11. Please see published information on Intuit's website for additional guidance.
Background
The Qvinci Admin, Leader, or Manager may assign the Entity Syncer role to the user who will be syncing the file. This person must have an Admin login for the file(s) they will be connecting. This Admin login is required in order to make the link (first connection) to Qvinci, per security requirements. After the link is established, only a user who can run reports in the file may sync it. There may only be one Entity Syncer for each Entity. (See section on User Roles.)
Video Tutorial
![]() Sync a QuickBooks Company File
Sync a QuickBooks Company File
Preliminary Steps
Step 1. If the accounting application is installed on a server or hosted environment and the Qvinci Sync Client has not yet been installed for your server profile, contact your IT professional to request the Qvinci Sync Client be installed on your server profile. Only a server administrator may install the Qvinci Sync Client.
Step 2. If the accountant application is installed on your local computer, and the Qvinci Sync Client has never been installed on the computer, Download the Qvinci Sync Client now. Install the Qvinci Sync Client on the same computer where the accounting application is also installed, not necessarily where the QuickBooks company files are stored.
Installing the Sync Client Software
Step 1. The executable for the Qvinci Sync App can be downloaded with the link below:
Download this to the same computer where your accounting application is installed.
Intuit has announced that only QuickBooks Desktop 2022 (Pro Plus, Premier Plus, Pro and Enterprise) R3 or later is certified as fully compatible with Windows 11 64-bit.
Please do not upgrade to other editions of Windows 11 until Intuit has certified that your QuickBooks release is compatible with Windows 11. Please see published information on Intuit's website for additional guidance.
Step 2. Run the Qvinci Sync installer to install the sync application to your Windows computer.
The Qvinci Sync Client application should be installed on all computers where a user will log in to manage their accounting files and perform syncing to Qvinci.
If the application is installed on both a server and local workstations, it is advisable that the Qvinci Sync application be installed in both places. This simply aids in additional sync activity occurring.
A reboot is recommended before a user utilizes the Qvinci Sync Client. The Windows Admin may opt to reboot “later” versus immediately.
Step 3. The sync client installer application is now installed and needs to be run. Go to Running the Qvinci Sync Client.
* Special Instructions for Running Installation on a Server:
Install the Qvinci Sync Client for ALL Server Users
Run the same executable above to install the Qvinci Sync Client across all user accounts on a server. Follow the same instructions above to complete the installation steps. All user accounts on the server will have the Qvinci Sync Client installed when a server admin performs the steps above.
- OR -
Install the Qvinci Sync Client for Specific Server Users
Follow the steps below using Command Prompt to install the Qvinci Sync App for specific users:
The server administrator should set the target user to be a local admin (if not already):
- Via the control panel if the user is a non-active directory domain user, or
- Via active directory policies if the user is a domain user
Step 1. Log in as the target user and download the Qvinci Sync Installer (Do not install).
Step 2. Open the Windows command line (Do not use “run as administrator”).
Open Windows Explorer and type cmd to launch the command line.
Step 3. Navigate to the folder to find where the sync app installer is downloaded.
Type “dir” for a directory if you need assistance navigating.
Type “cd folder name” to switch to the folder where Qvinci is downloaded.
Repeat steps 1 & 2 if needed until Qvinci download is reached.
Alternatively, you can copy the entire folder path from file explorer and use the "CD" command and paste to navigate straight to the correct path.
Next, run the installer from the command line with the additional parameters as follows and install as you normally would:
QvinciSyncSetup.exe ALLUSERS=2 MSIINSTALLPERUSER=1
-
- If you get an Admin login prompt, something is wrong. Go back to initial Step 1.
- You may get a UAC (User Account Control) prompt. This is fine; click Yes.
- You may be prompted to restart the system … don’t restart yet.
- Log out of the target user.
- Log in as Admin and remove the target user’s local admin privileges that you added in Step 1.
- Now restart if you were told to restart. It is advisable to not restart the server unless all users are logged out.
After the optional restart, the target user can log in & use the system. No one else but the target user should have Qvinci.
IMPORTANT — Qvinci supported operating systems:
Windows Server 2012, R2, and Newer versions
Microsoft Windows Server lifecycle
The Qvinci Sync Client uses the following two file paths:
c:\Users\<user>\AppData\Local for sync log files
c:\Users\<user>\AppData\Roaming\Qvinci for user config files
The IP address that the Qvinci Sync Client utilizes is: 52.54.8.226
Running the Qvinci Sync Client on a Server
The Qvinci Sync Application can connect to the accounting software versions listed below.
- QuickBooks Desktop version: USA 2009+ (Pro, Premier, Enterprise, Accountant)
- QuickBooks Desktop version: Canadian 2009+ (Pro, Premier, Enterprise, Accountant)
❗ NOTE: Other accounting software can sync to Qvinci, without the Qvinci Sync Application method.
If you utilize supported accounting software, proceed to downloading the Qvinci Sync Application. The person responsible for installing the sync application must have Windows Admin permissions. The Qvinci Sync Application must be downloaded to the same computer where the application is installed.
Download the Qvinci Sync Client
Save the file to your default download location ... and optionally choose Open File.
3. If you opted to "Save File," navigate to your default download folder to find QvinciSyncSetup.exe and Run the file.
- The installer will require you to accept the terms and conditions for using the sync application. You must scroll to the bottom of the text box to accept the terms.
- Microsoft .Net 4.0 is required for the sync application to run. This will automatically install during the sync app installation if it is not on your computer.
4. Once complete, a blue “Q” icon will appear bearing the name “Qvinci Sync”. This is your sync application.
5. The Contributor may now sync their file(s) by following the instructions for Linking and Syncing.
More Information about the Sync Client:
The Qvinci Sync Client uses the following two file paths:
- c:\Users\<user>\AppData\Local for sync log files
- c:\Users\<user>\AppData\Roaming\Qvinci for user config files
Linking and Syncing
Step 1. Open the desired file using the Admin login. For security purposes, Intuit requires the Admin login to be used when linking a file to a third-party application.
Step 2. Open the Qvinci Sync Client. The Qvinci Sync Client should load as a startup program when the computer is turned on in the future. This means you will find it running in the System Tray of the desktop (lower right corner, by the clock). If it is not found in the System Tray, double-click the desktop icon. The Qvinci Sync Client will load to the System Tray. Double-click the icon in the system tray (highlighted green below). If you do not see the Qvinci icon there, it may be under the "Hidden Icons" section, which you can view by clicking on the up arrow (highlighted in yellow).
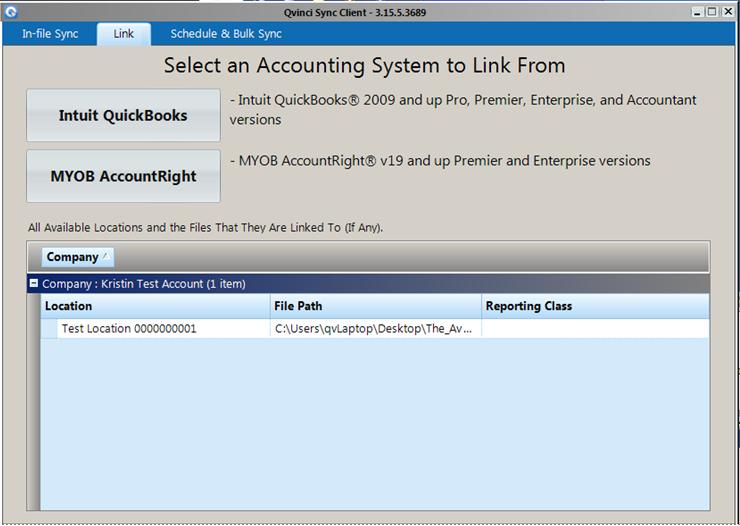
Step 3. Once the Qvinci Sync Client loads on the screen, click the Link tab in the blue bar across the top.
Step 4. Log in with your Qvinci credentials. All Entities assigned to your login will appear once you have logged in. If no Entities appear, completely close and relaunch your Qvinci Sync Client so that you are required to log in on the Link tab again. Otherwise contact your Qvinci Admin, Leader, or Manager to ensure you have an Entity assigned to your login. If you are the Admin, Leader, or Manager assigned the Entity Syncer permission, see instructions on setting Entity Syncer permissions here.
Step 5. Click the "Intuit QuickBooks" button in the top left.

Step 6. An example QuickBooks Application Certificate will appear, prompting you on what to fill out inside your accounting application to link the file. Simply ignore this example screen. Do not click Cancel on the example.
Step 7. Migrate back to your accounting system and the blank Application Certificate will appear for you to fill out.
Step 8. Check the box to "Yes, allow access..." in order to proceed with linking the file. If a user's dropdown box appears, always select “Admin.” Checking the second box to "allow this application to access personal data..." is not necessary.
If the file has been linked or has an existing token this pop-up will occur.
Step 9. After linking the file, you might see this prompt as a warning that this file might have been linked previously. (Never use copies of QB files; there is meta-data in the file that will confuse our system.)
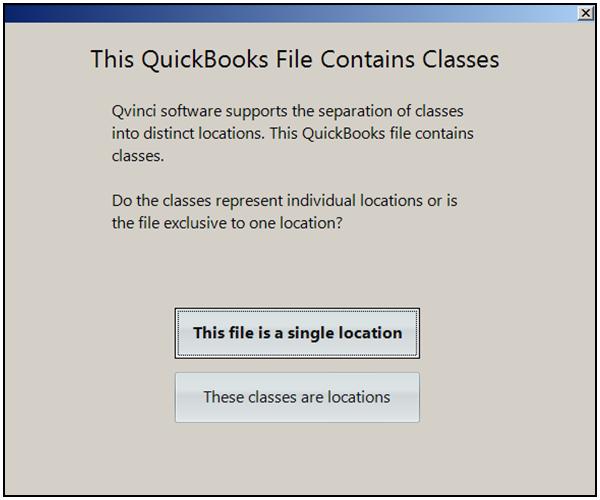
Step 10. If classes are detected in the file, the user will be prompted to select a preference. If the user wishes to sync the entire file, versus just individual classes, select the "single location" button. Proceed to step 10. However, if the user wishes to sync individual classes, as opposed to the entire file, follow the steps for Class Syncing.

Step 11. On the following screen click ON the Entity/Location name from the list that appears. If you do not click ON the location name prior to clicking the "Select Location" button then the file will NOT be tied to the location and you will receive an error message.
Step 12. Click the "Link and Sync Now" to prompt Qvinci to sync the file right away. (If you have several files, you can simply choose to 'link' them only and Qvinci will sync the file next time it is opened.)
It is expected behavior for the progress bar to travel halfway and then pause. The final and largest query occurs at the halfway mark. Depending upon the size of the file, the average sync time is 30 seconds - 2 minutes.
Step 13. If budget data exists in the file, users will find that the budget data syncs automatically, without prompting. If no budget data exists in the file, users will find that any Budget vs Actual reports will render "0" in the budget fields in Qvinci.
Step 14. Repeat the above steps to link additional files. Be sure to close the existing file and open the next one in order to link the correct file.
Step 15. After syncing, close out of this sync client application with the X at the top right corner.
It is recommended that you open Qvinci on the web, navigate to Tools > Sync Activity report in the Qvinci platform to confirm a successful sync.
________________________________________________________________________________________________________________
Have Questions?
We're More Than Happy To Help
Schedule a Call with Customer Success below, email us at support@qvinci.com or call us at 1-512-637-7337 Ext. 1 Available M-F, 7:30am-6:30pm CT and it is always FREE!

Comments
0 comments
Article is closed for comments.