Overview
Non-financial reporting is a form of transparency reporting where businesses formally disclose certain information not related to their finances. It helps organizations to measure, understand, and communicate impacts, set goals, and manage change more effectively. Finances don’t always provide the story of what is happening in your business. Why did sales revenue go down in one month? Why did the operating cash go up in Q2? Non-financial reporting provides for these performance measures which can fill in the gaps and give answers on monetary fluctuations. For example, if marketing efforts missed the mark in a single month, you can expect this to reflect in the quarterly P&L.
NOTES: Non-Financial Syncing (NFS) is only available if requested by an account Admin. Please contact Qvinci support for more information. Non-financial syncing also requires Excel 2007 or newer.
If you are familiar with syncing P&L data via Excel, non-financial syncs are powered via the same engine, so the steps are nearly identical.
Generate the Template for the Selected Entity
Step 1. The Entity Syncer should log in and navigate to Manage > Entities on the left-hand menu.
Step 2. Select the Entity for which you'd like to sync non-financial data.
Step 3. Click on the "Non-Financial Sync" tab.
Step 4. Click the blue "Generate Template" button.
Step 5. Open the template in Excel.
NOTE: If the "Non-Financial Sync" tab does not appear, you are either not logged in as the Entity Syncer or the Non-Financial Sync feature has not been enabled for your account.
Review Required Formatting Rules
Strict formatting is required to ensure data can be read correctly. Please review the following guidelines for non-financial syncing.
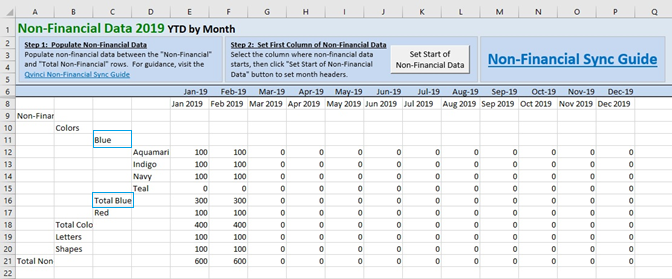
1. Account names must be entered on the left between the category titles of "Non-Financial" and "Total Non-Financial." These titles will be pre-populated in the template and are required; do not remove them. You can insert additional rows above the "Total Non-Financial" row if needed.
2. Non-financial account names must be unique.
3. If you have parent/child accounts in your data set, a header and total row are both required (See "Blue" and "Total Blue" in the example below.
4. Parent accounts should have no data for any month and must be completely blank
5. non-financial accounts and Total rows must contain data for at least one month. You can enter 0s for accounts without activity, as shown in Row 15 of the example.
Enter Non-Financial Data in the Template
Step 1. Click "Enable Editing" in the yellow bar across the top so that you can make changes.
Step 2. Click "Enable Content" in the yellow bar across the top, as macros are required for successful syncing.
Step 3. Navigate to the "NF" tab for the year which you need to sync. (For example, to sync non-financial data for 2019, you'd navigate to the "NF19" tab.) This tab will be pre-populated with any existing data or SCoA accounts if applicable; otherwise, example accounts will be present.
Step 4. Delete any account rows you do not need and feel free to add additional rows for accounts that were not pre-populated.
REMINDER: All account names must exist between the "Non-Financial" and "Total Non-Financial" titles, which are required and must remain in the template.
Step 5. Click on any cell in the first blank column and click the gray "Set Start of Non-Financial Data" button, which will add month labels in Row 6.
Step 6. Enter your data for each non-financial account for the appropriate month(s). Each account and total row MUST have data for at least 1 month to sync successfully. You can add 0s for rows that don't have any transactions for the period.
Step 7. Save the template to your computer, keeping in mind you can re-use this template to update data for future months.
Step 8. In your web browser, navigate back to the Manage > Entities > non-financial page.
Step 9. In the "Sync Non-Financial Data" section, go to Step 2 and click the "Browse/Choose File" button.
Step 10. Select the Excel file that was just saved to your computer.
Step 11. Click the green "Sync" button under Step 3.
How to Create New Year Tabs with Non-Financial Sync
-
If you are using a non-financial template, NFS users can add a new tab for the next year starting in December of the current year.
-
If you downloaded the template in a previous year, click on the "Create worksheet for this year" button on the Location tab of the non-financial template.
-
This option is only available if you download an updated template.
Troubleshooting Unsuccessful Syncs
Check that all of the following are true:
-
All account names are between the "Non-Financial" header and "Total Non-Financial" row.
-
All account names are unique.
-
Parent account headers do not have data.
-
All account rows and total rows do have data for at least one month.
-
All parent accounts have a matching total row.
-
Date headers are present in Row 6 (populated by clicking "Set Start of Non-Financial Data").
If you're still having issues, contact Qvinci Support with a copy of the syncing template handy.
Have Questions?
We're More Than Happy to Help
Schedule a Call with Customer Success below, email us at support@qvinci.com or call us at 1-512-637-7337 Ext. 1 Available M-F, 7:30am-6:30pm CT and it is always FREE!

Comments
0 comments
Article is closed for comments.